
Tutorials
In this page we will write some information how to use this demo. Some of this tutorials are useful for any kind of site, some of them are just for Directory and Marketplaces.
Basic settings
After your first installation, you should make MUST have settings.
First of all, go to Settings – General and enable option for open registration. Enable it if you need to have multi-user site

Next important setting is permalinks. We recommend next permalinks

Ok. It’s enough. Now, you can customize size of site, logo, colors and editing your homepage. You can do this in Theme option or directly on your site from Customizer. Check our video
Also, please find more documentation about basic settings
back to menu ↑How to Edit Homepage
Go to pages – all pages and find your Homepage. Click to Edit in Elementor

it can be hard to edit some elements because they can be over other elements. It’s because Elementor has unlimited number of layers. You can simply click with right click and get access to Navigator. Then, you can choose any element and edit it.
If you want to edit background images and colors, you can do this by editing section (sometimes column) background. Background option is available in Style tab

Woocommerce options
Next step is setup of woocommerce. You must install woocommerce before installing our demo.
Now, find your “My account page”. You will need link on this page. Usually, it’s /my-account
Copy link to My account and insert in Theme option – User Option – Custom Register Link
My account is page where users can login. It’s also page where users can see their orders (if you have shop on site). We will use this page for registration. For this, enable next option in Woocommerce settings

When user registers on site, he will find link to register as vendor
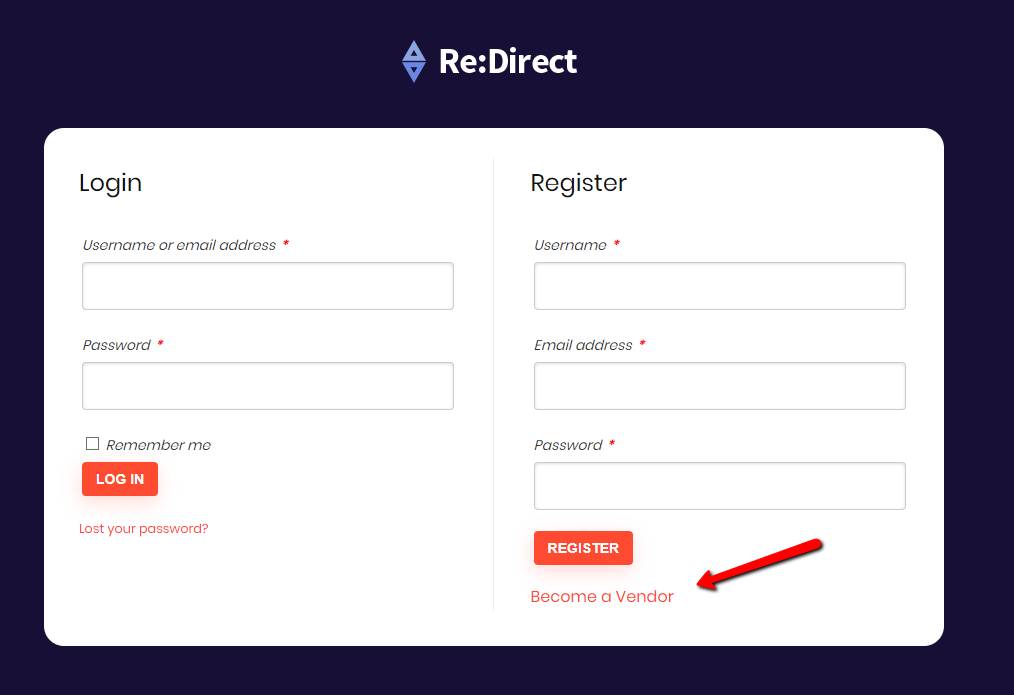
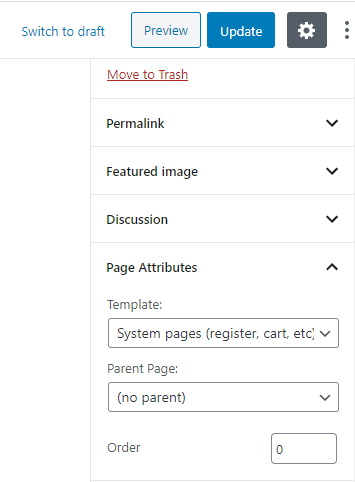
Then, he will be redirected to another page with Vendor registration form. This page is created automatically in WCFM plugin. We recommend to find it on your site in Pages – All pages (it will be marked as vendor registration page). Edit page as admin and change it’s layout in page attributes. We recommend special System layout
You can control fields of this page in Settings of WCFM – Vendor registration. You can add additional fields to form if you want.
if you want to skip My account registration, you can use just Vendor membership page and use it’s link in theme option – user option
back to menu ↑How to change Shop Link to Directory Link
By default, woocommerce has next link as main link of your shop – site.com/shop
But if your site is more Directory than shop, you may need to change it to Directory link like site.com/directory
It’s easy to do. Go to all pages of your site and find Shop page

Quick Edit this page. Then, change slug to page.

If you imported our demo, you may need to choose Directory page as page of your shop. Go to Woocommerce – settings – Products and choose page as your shop page

Multivendor options
It’s time to install Vendor plugins (only if you want to have multivendor site where other users can register on site, sell something or add their own deals, services, apps, reviews (or anything which you need). In this demo we will use WCFM plugin, because it has more functions than other. But if you prefer other plugin – you can use them. Theme has official support for WCFM, WC Vendor, WC Marketplace, Dokan. See comparison of multi vendor plugins
So, go to Plugins – Add new and search WCFM

Install WCFM marketplace. Install WCFM Frontend if you want to allow posting from dashboard and WCFM Membership if you want to have different types of memberships on site
Go to settings of WCFM and Open Module settings


WCFM has many modules, but we don’t need all of them, especially if you don’t want to sell something on site and you want to use site as classified, service reviews or directory of something.
Now go to Settings – Dashboard style and store style and also Membership – Styles. You simply need to resave these pages and theme will auto populate styles which you added in theme as default styles of plugin. You can change any colors if you need.
back to menu ↑Membership Features
Now, you can add memebership functions on site (or skip them if you don’t need them).
First of all go to WCFM settings – membership and create few memebrships. There is several video tutorials how to create them.

If you want the most deep integration membership and vendor dashboard, you should buy special WCFM addon Group and Staff
If you don’t need deep integration, you can use special theme shortcodes for membership
As you see, we have special shortcode for WCFM memberships
Where can you get role ID? When you register or create memebrship, you will find ID in shortcode of buttons

So, you can use this shortcode and add content which you want to have only for this membership.
Also, we have price table on homepage. you must copy subscribe button url for each membership and add link to Price table buttons on homepage
back to menu ↑How to make classified and directory vendor options instead shop
By default, vendor plugins will add option to sell something on your site. What if you don’t want to sell something and you want to make directory, catalog or service, app site? You need to disable shop product types and leave only external type of products. There are few ways to do this: you can disable external products totally or set them in separate categories
Go to WCfm settings – Capabilities and disable everything which is related to shop. Leave only External type of products

Now, go to WCFM settings – Settings – Menu manager and rename your labels.
What if you want to extend regular submit forms and use own plugins. For example, we use RH Frontend plugin (bundled with theme) to build extended forms for Coupons and App reviews. So, you must create these forms and place them on pages. If you missed somehow our forms and didn’t install RH frontend plugin before demo import, you can import forms separately. Download this file and save it. Install RH frontend PRO plugin from Rehub – plugins section. Go to RH Frontend Settings – Data – import forms and import forms.
If you want to know more about Fronend plugin
Rh frontend plugin is not required, you can use any other, like Gravity form or WPUF. Of course, you can use form shortcodes with Membership shortcodes to build forms which are available only for special membership roles on your site
Ok, once you have all pages for submit and edit posts, go to Theme option – Additional links for vendor panel and add all links and labels.
And, it’s opposite. If you want to remove these custom links, delete everything from this panel

Locator Options
WCFM has inner integration with GMW plugin and Rehub theme has some additional layouts for this plugin. You can read more in our tutorials
For redirect demo, you just need to install Geo My wordpress plugin and add your Google map API keys for map.
back to menu ↑Additional resources
We have a lot of other tutorials and step by step guidelines. Please, check them if you need
How to make Multivendor site on WordPress
Creating Directory. Classified sites with Rehub and woocommerce
We also have video channel with tutorials and secrets of theme and wordpress.
If you have some question, please, try to find answer in our documentation, blog and google.

We added more than 500 articles and 20 step by step guides, so, this will cover near 90% of your needs even for custom complex requirements.
Please, write to our support if you still can’t find answers in suggested resources. We also made many step by step tutorials. You can find them below